

ReactJS Framework 18 - Architecture - CRUD Example App -Axios-- Json-Server -Hooks


♠️♠️♠️♠️♠️♠️♠️♠️♠️Hello Folks! ♠️♠️♠️♠️♠️♠️♠️♠️♠️
Today, I've decided to share my first blog about {ReactJS Framework 18 - Architecture - CRUD Example App - Axios - Json-Server - Hooks} for beginners and professionals alike. If you're looking to gain a general idea and best practices of this framework, I've got you covered. So, grab a cup of coffee to open your eyes wide ☕️😊 and let's get started! 🚀
♠️♠️♠️♠️♠️♠️♠️♠️♠️ Plan ♠️♠️♠️♠️♠️♠️♠️♠️♠️
What is React JS 🤔
- Explore the fundamentals of React, its purpose, key concepts, and its architecture.
How to Create a Simple App 🛠️
- Step-by-step guide on creating a basic React application.
Hooks ⚓
- Dive into the world of React Hooks - understanding their usage and benefits.
Axios 🌐
- Learn about Axios, a promise-based HTTP client, and how to integrate it into your React applications for efficient data fetching.
Let's embark on this exciting journey together! Stay tuned for each step. ♻️🚀
- What is React JS 🤔🤔🤔
Back in 2011, Facebook, boasting a massive user base, encountered a formidable challenge. The objective was clear: to provide users with a richer experience through a more dynamic and responsive interface that delivered speed and high performance.
To tackle this task, Jordan Walke, a software engineer at Facebook, introduced React. The purpose was simple yet groundbreaking: to simplify the development process by offering an organized and structured approach to building dynamic, interactive user interfaces through reusable components.
The initial implementation of React occurred in Facebook's newsfeed. Its revolutionary approach to DOM manipulation and user interfaces reshaped Facebook's web development strategy, swiftly gaining popularity within the JavaScript ecosystem after being released to the open-source community.
React.js, an open-source JavaScript library meticulously crafted by Facebook, aims to streamline the intricate process of developing interactive user interfaces. Envision a user interface built with React as a collection of components, each tasked with producing a small, reusable piece of HTML code.
If you ever wonder why you should use React.js: over simple JavaScript and HTML pages, the answer is encapsulated in JSX. With JSX, you can consolidate your entire application into a single, cohesive entity, offering a more efficient and organized approach to building dynamic user interfaces compared to the traditional use of plain JavaScript and HTML
1.1 React Architecture
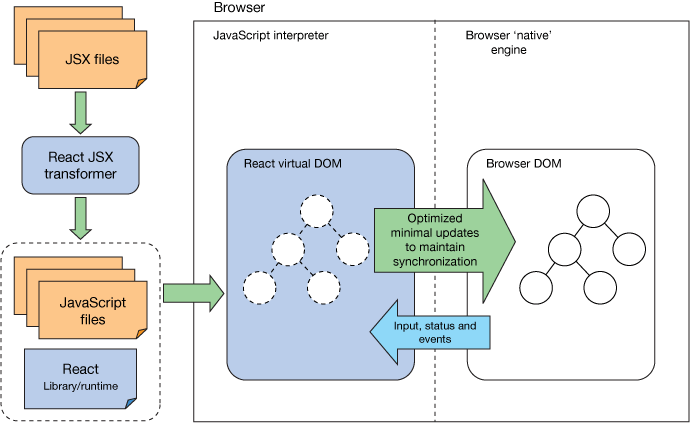
The image shows the process of how a React SPA (Single Page Application) works. It includes the following steps:
Browser: The user interacts with the web application through the browser.
JavaScript interpreter: The browser's JavaScript interpreter reads the JavaScript code of the application.
JSX files: The JavaScript code includes JSX files, which are a syntax extension to JavaScript that allows you to write HTML-like structures.
React JSX transformer: The React JSX transformer converts the JSX files into regular JavaScript code.
React virtual DOM: The React virtual DOM is an in-memory representation of the actual DOM. It is used to efficiently update the DOM when the state of the application changes.
Browser native engine: The browser's native engine renders the virtual DOM into the actual DOM.
Optimized minimal updates: React only updates the parts of the DOM that have actually changed, which helps to improve performance.
JavaScript files: The JavaScript files also include code for handling user input, application state, and events.
React Library/runtime: The React library provides the components and functions that are used to build React applications.
Overall, this part shows how React SPAs are designed to be efficient and performant. By using a virtual DOM and only updating the parts of the DOM that have changed, React applications can avoid the need to re-render the entire DOM every time the state of the application changes. This can lead to significant performance improvements, especially for applications with complex UIs.
- How to Create a Simple App {Let's Code It} 💻
Step 1: Install Node.js
If you haven't installed Node.js yet, head over to Node.js website and download the latest version.
Step 2: Set Up Your React.js Project
Open your terminal and navigate to the directory where you want to create your React.js app. Run the following commands:
npx create-react-app my-react-app
cd my-react-app
npm start
This will create a new React.js project named "my-react-app" and start a development server.
Step 3: Let's Code!
Open your favorite code editor and start building your simple React.js app. Dive into the src directory, explore App.js, and let the coding adventure begin!
Happy coding! 🚀
Create a New Component
Let's create a new component. In the src directory, create a new file named MyComponent.js. Add the following code to define your new component:
jsxCopy code// src/MyComponent.js
import React from 'react';

const MyComponent = () => {
  return (
    <div>
      <h2>This is MyComponent</h2>
      {/* Add your component content here */}
    </div>
  );
};

export default MyComponent;
Step 4: Use Your New Component
Open src/App.js in your code editor and import MyComponent at the top:
jsxCopy code// src/App.js
import React from 'react';
import MyComponent from './MyComponent'; // Import the new component

function App() {
  return (
    <div className="App">
      <h1>My React App</h1>
      <MyComponent /> {/* Use your new component here */}
    </div>
  );
}

export default App;
3 Hooks
Hooks are a new addition in React 16.8. They let you use state and other React features without writing a class.
Certainly! Let's enhance the tutorial to include the usage of three commonly used React Hooks useState, useEffect, and useContext. I'll illustrate how to apply each of them in the context of your simple React.js app:
useState:- Use
useStatewhen you need to manage and update component state in functional components, enabling dynamic content and reactivity without the need for class components.
- Use
useEffect:- Employ
useEffectwhen handling side effects, such as data fetching, subscriptions, or DOM manipulations, ensuring that these operations occur at the right time during the component lifecycle.
- Employ
useContext:- Choose
useContextwhen you want to access and update shared state or values across multiple components without prop drilling, promoting a cleaner and more maintainable approach to managing global or shared data.
- Choose
Part 1: UsinguseState in React
Let's create a new component that utilizes the useState Hook. In the src directory, create a new file named Counter.js. Add the following code to define your new component:
Certainly! Let's break down the tutorial into parts, each explaining one React Hook. I'll start with useState.
Part 1: UsinguseState in React
In this section, we'll explore how to use the useState Hook in a React component.
Step 1: Create a New Component with useState
Let's create a new component that utilizes the useState Hook. In the src directory, create a new file named Counter.js. Add the following code to define your new component:
jsxCopy code// src/Counter.js
import React, { useState } from 'react';

const Counter = () => {
  // useState example
  const [count, setCount] = useState(0);

  return (
    <div>
      <h2>Counter Example with useState</h2>
      <p>Count: {count}</p>
      <button onClick={() => setCount(count + 1)}>Increment Count</button>
    </div>
  );
};

export default Counter;
Step 2: Use Your New Component
Open src/App.js in your code editor and import Counter at the top:
jsxCopy code// src/App.js
import React from 'react';
import Counter from './Counter'; // Import the new component

function App() {
  return (
    <div className="App">
      <h1>My React App</h1>
      <Counter /> {/* Use your new component with useState here */}
    </div>
  );
}

export default App;
Now, your Counter component demonstrates the use of useState for managing state in a functional component.
Part 2: ExploringuseEffect in React
In this section, we'll learn how to use the useEffect Hook to handle side effects in a React component.
Step 1: Continue with Existing Project
Ensure you have the existing React.js project set up. If not, follow the steps mentioned in Part 1 to set up your project.
Step 2: Create a New Component with useEffect
In the src directory, create a new file named EffectExample.js. Add the following code to define your new component:
jsxCopy code// src/EffectExample.js
import React, { useState, useEffect } from 'react';

const EffectExample = () => {
  // useState example
  const [count, setCount] = useState(0);

  // useEffect example
  useEffect(() => {
    document.title = `Count: ${count}`;
  }, [count]);

  return (
    <div>
      <h2>Effect Example with useEffect</h2>
      <p>Count: {count}</p>
      <button onClick={() => setCount(count + 1)}>Increment Count</button>
    </div>
  );
};

export default EffectExample;
In this example, the useEffect Hook is used to update the document title whenever the count state changes.
Step 3: Use Your New Component with useEffect
Open src/App.js in your code editor and import EffectExample at the top:
jsxCopy code// src/App.js
import React from 'react';
import EffectExample from './EffectExample'; // Import the new component

function App() {
  return (
    <div className="App">
      <h1>My React App</h1>
      <EffectExample /> {/* Use your new component with useEffect here */}
    </div>
  );
}

export default App;
Now, your EffectExample component demonstrates the use of useEffect to perform side effects in a React component. In this case, it updates the document title based on the count state.
Feel free to experiment and customize these examples based on your specific requirements. If you're ready, we can move on to Part 3, where we'll explore the useContext Hook.
Part 3: UtilizinguseContext in React
In this section, we'll learn how to use the useContext Hook for state management in a React component.
Step 1: Create a Context and Provider
Create a new file named MyContext.js in the src directory. Add the following code to define your context and provider:
jsxCopy code// src/MyContext.js
import React, { createContext, useState } from 'react';

const MyContext = createContext();

const MyContextProvider = ({ children }) => {
  const [value, setValue] = useState('Default Value');

  return (
    <MyContext.Provider value={{ value, setValue }}>
      {children}
    </MyContext.Provider>
  );
};

export { MyContext, MyContextProvider };
In this example, we're creating a simple context (MyContext) with a default value and a provider (MyContextProvider) that wraps its children.
Step 3: Use useContext in a Component
Now, let's create a new component named ContextExample.js in the src directory:
jsxCopy code// src/ContextExample.js
import React, { useContext } from 'react';
import { MyContext } from './MyContext';

const ContextExample = () => {
  // useContext example
  const { value, setValue } = useContext(MyContext);

  return (
    <div>
      <h2>Context Example with useContext</h2>
      <p>Value from Context: {value}</p>
      <button onClick={() => setValue('New Value')}>Change Context Value</button>
    </div>
  );
};

export default ContextExample;
In this component, we're using the useContext Hook to access the value and setter function from the MyContext context.
Step 4: Use Your New Component with useContext
Open src/App.js in your code editor and import ContextExample at the top:
jsxCopy code// src/App.js
import React from 'react';
import { MyContextProvider } from './MyContext'; // Import the context provider
import ContextExample from './ContextExample'; // Import the new component

function App() {
  return (
    <MyContextProvider>
      <div className="App">
        <h1>My React App</h1>
        <ContextExample /> {/* Use your new component with useContext here */}
      </div>
    </MyContextProvider>
  );
}

export default App;
Now, your ContextExample component demonstrates the use of useContext for accessing and updating values in a React context.
Congratulations! You've covered three essential React Hooks - useState, useEffect, and useContext. Feel free to experiment and integrate these hooks into your React app based on your specific needs.
Axios
Axios is a popular JavaScript library used for making HTTP requests in web applications. It provides a simple and consistent interface for sending asynchronous requests to a server.
Step 1: Install Axios
In your React.js project, open a terminal and run the following command to install Axios:
npm install axiosStep 2: Import Axios in your Component
In the component where you want to make HTTP requests, import Axios:
 jsxCopy code// src/YourComponent.js
 import React, { useEffect, useState } from 'react';
 import axios from 'axios';

 const YourComponent = () => {
   // Your component logic here

   return (
     <div>
       {/* Your component JSX here */}
     </div>
   );
 };

 export default YourComponent;
Step 3: Make a GET Request
Inside your component, use Axios to make a simple GET request to an API:
 jsxCopy code// src/YourComponent.js
 import React, { useEffect, useState } from 'react';
 import axios from 'axios';

 const YourComponent = () => {
   const [data, setData] = useState(null);

   useEffect(() => {
     // Axios GET request
     axios.get('https://jsonplaceholder.typicode.com/todos/1')
       .then(response => {
         setData(response.data);
       })
       .catch(error => {
         console.error('Error fetching data:', error);
       });
   }, []);

   return (
     <div>
       <h2>HTTP Request with Axios</h2>
       {data && (
         <div>
           <p>Title: {data.title}</p>
           {/* Display other relevant data */}
         </div>
       )}
     </div>
   );
 };

 export default YourComponent;
Step 4: Make Other Requests
Axios supports various HTTP methods. For example, to make a POST request:
 jsxCopy code// src/YourComponent.js
 // ... (previous code)

 useEffect(() => {
   // Axios POST request
   axios.post('https://jsonplaceholder.typicode.com/posts', { title: 'New Post' })
     .then(response => {
       console.log('Post created:', response.data);
     })
     .catch(error => {
       console.error('Error creating post:', error);
     });
 }, []);

 // ... (rest of the component)
Adjust the URLs and data according to your specific API requirements.
Step 5: Handling Headers and Configurations
You can also include custom headers or other configurations in your Axios requests:
 jsxCopy code// src/YourComponent.js
 // ... (previous code)

 useEffect(() => {
   // Axios request with headers
   axios.get('https://api.example.com/data', {
     headers: {
       'Authorization': 'Bearer YOUR_ACCESS_TOKEN',
       'Content-Type': 'application/json'
     },
     params: {
       // Additional parameters if needed
     }
   })
     .then(response => {
       console.log('Data fetched with custom headers:', response.data);
     })
     .catch(error => {
       console.error('Error fetching data with custom headers:', error);
     });
 }, []);

 // ... (rest of the component)
This part covers the basics of using Axios in a React.js application. Adjust the code based on your specific use case and API requirements.
I'm excited to introduce a significant project that delves into the concepts we've discussed. You can explore all the explained concepts by visiting the following link: Project on GitHub.
BRAIMI HAMZA